2024-02-20
Frameworks and developed libraries play a very import role in Modern day web development. Web developers require efficient frameworks to be able to develop responsive webs.
Blog post by MF Mabala
Creating A Blog Using Next.js and Sanity Studio using the App Router.

In this blog I will be tell you how I created my first blog using next.js and sanity studio.
What is Next.js
Next.js is a react framework for building full-stack applications.
What is Sanity
Sanity is is an open source headless real time Cloud Management System that you can customize with JavaScript also typescript and React.
Installing Next.js and Sanity Studio
Installing Next.js
In your computer create an empty folder and open it in VSCODE and run the following
npx create-next-app@latestselect the preferred install options
- What is your project named? ... "Given name"
- Would you like to use TypeScript with this project? ... Yes
- Would you like to use ESLint with this project? ... Yes
- Would you like to use Tailwind CSS with this project? ... Yes
- Would you like to use `src/` directory with this project? ... No
- Would you like to use App Router? (recommended) ... Yes
- Would you like to customize the default import alias? ... No
This will install all the dependencies needed. To view the live run of the app you have to
- Change directory to the project name in this case ‘cd Given name’
To view your app on the browser open the terminal run make sure you are in the next.js folder the following command and follow the localhost:3000 link:
npm run devInstalling Sanity studio
In a new terminal outside your Next.js application
Type in the following commands
- make a new directory and name it what you want
mkdir sanity-studioafter making the new directory run the following commands:
cd sanity-studio
npm create sanity@latestSelect the preferred install options
- Project name: Sanity Next.js Site
- Use the default dataset configuration?: Yes
- Project output path: C:\Users\USER\Desktop\sanity-studio
- Select project template: Clean project with no predefined schemas
- Do you want to use TypeScript? Yes
- Package manager to use for installing dependencies?: npm
To Run the studio in the terminal type ‘npm run dev’ and will appear on your localhost:3333
End server then run the following command.
npm install sanity next-sanityI used to tailwindcss and npm next-themes then I ran the following commands to install them.
npm install next-themes
npm i -D @tailwindcss/typographyEmbedding sanity studio into our next.js project
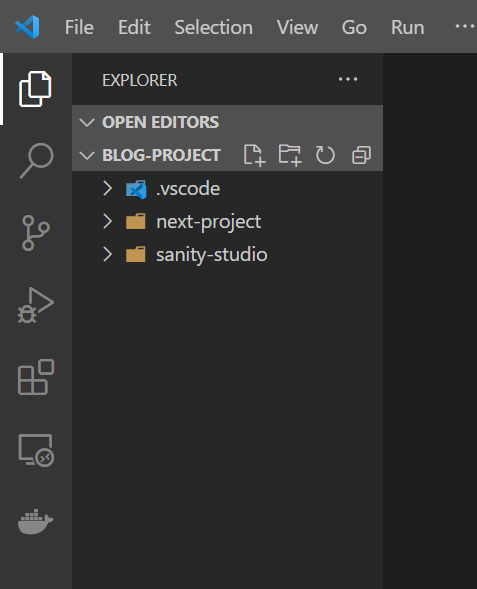
We created the next.js app and sanity studio in a way that each has its own folder separately. In this part of the blog I will show you how to embed the sanity studio into the next.js project.
At this point your VSCODE should look like this

Go into your sanity folder you will find the the sanity.config.ts and sanitty.cli.ts files copy the two folders or just simply move them to your next.js project folder. In the sanity studio there will be a schemas folder or sometimes it is named schematypes you also need to copy that file into the next.js project.
Now you have everything you need . in Your terminal cd into you next.js project and run the following command.
npm i next-sanity
npm i next-themes
npm install @portabletext/react @sanity/image-urlAs you develop your blog you will have to install more dependencies.
Inside your next.js folder open the sanity.config.ts and add a basepath like below: see line 12.

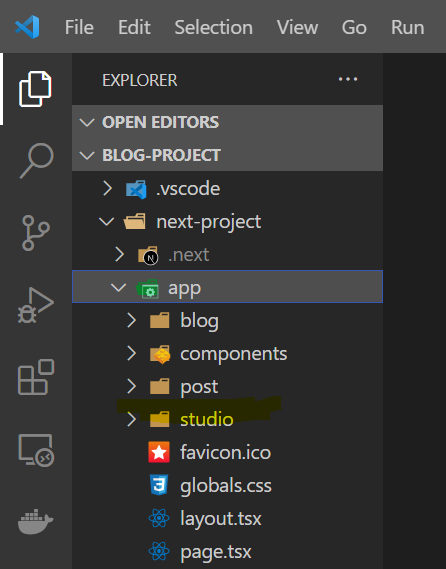
Please note that our projectId wont be the same . Inside the app folder create a new folder and name it studio. Remember that you have to name the folder the way you named the base path. If your basepath is "/admin" then the name of the folder you will create will be admin. Here is an example of where you folder should go.

inside the studio folder create another folder and name it:
[[...index]]inside the new folder add a new folder that you name page.tsx. Everything should look like this:

Now that you have embedded sanity to your project inside the studio\[[...index]]/page.tsx add the following code.
import { NextStudio } from "next-sanity/studio";
import config from "@/sanity.config";

export default function Studio() {
  return <NextStudio config={config} />;
}Please make sure to fix the imports . You can now open your terminal and run npm run dev and access the page at localhost:3000. To access the studio type http://localhost:3000 on your browser. There will be an cors error on sanity where you have to add the localhost:3000 to your cors origin on sanity . Agree and add then you are able to access you studio onhttp://localhost:3000/studio
Alternatively you can log into sanity.io and locate your current project. Under API there is Cors Origin add the http://localhost:3000 to the list . Then you are good to go.